How To Harvest, Dry and Store Homegrown Hops for Beer
As you become a deft and experienced brewmaster, you might want to grow hops to make beer at home. Just like you need all the necessary homebrew beer equipment, you have to harvest, dry, and store homegrown hops the right way, in appropriate conditions using suitable tools.
Harvest homegrown hops by picking only the ripe ones by hand. Dry the fresh and ripe hops in a food dehydrator until the cones have ~8% to 10% water content by weight. You can vacuum-seal the dried hops or use airtight containers to store them in the freezer.
You may need to customize the standard methods of harvesting, drying, and storing homegrown hops for beer based on the condition, variety, and volume of your produce. Read on to learn the best methods and how you should tweak them to harvest, dry, and store your homegrown hops.
When Should You Harvest Your Hops?
Hops are among the 8 essential ingredients you must have to brew beer unless you use one of the alternatives. But your homebrew beer is likely to be too sweet without hops, so you need an appropriate substitute, which could be herbs for a distinct character or spices for flavors.
Some homebrewers make beer with mushrooms. But even then, you will probably need hops for the following distinct characteristics:
- Aroma
- Flavor
- Odor
- Texture
None of these 4 distinct attributes are as potent in unripe hops as they are in ripe cones, which are the mature female inflorescences or flowers of the Humulus lupulus plant. This fact applies to all varieties of hops, which are broadly classified as the following:
- Aroma hops: added toward the end of the boil
- Bittering hops: in the kettle from the start of the boil
- Dual-use hops: cones that can serve both purposes
Thus, you must harvest homegrown hops only after confirming that the cones are ripe, not unripe or overripe. Slightly overripe hops may not be an issue, but unripe cones should not be harvested. The problem, in this case, is that homegrown hops may not ripen simultaneously.
Here are a few facts you must know about how homegrown hops grow, mature, and ripen:
- Homegrown hops may not have a lot of mature or ripe cones to harvest in the first year.
- Hops or cones of different varieties usually don’t ripen identically or simultaneously.
- The same variety of hops may not have all the cones desirably ripe on the harvest day.
Therefore, while the cones generally ripen in August through September, you must choose a harvest day after checking the ripeness of your homegrown hops.
Here are a few effective ways to physically and visually inspect hops for the desired ripeness:
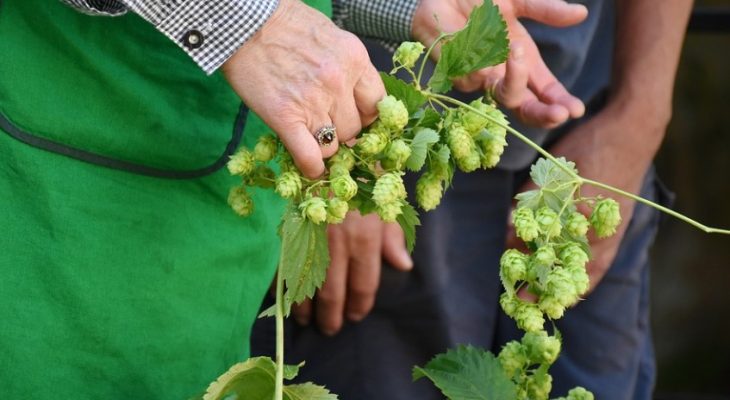
- Check the color of hop cones and assess the shades of green and yellow to know if they are ripe or unripe. Ripe hops appear bright or light green to pale yellow. Unripe cones are deep green. Overripe hops are brown. Ripe cones may also be a bit brownish.
- Cut a hop vertically to inspect the resinous substance inside called lupulin, which should appear bright yellow if the cone is ripe. The lupulin glands in unripe hops are pale yellow, and they aren’t as rich in essential oils and resins, so they are less potent.
- Press a hop cone with your fingers to feel if it is soft and pliable. Ripe hops aren’t squishy. You will feel some degree of brittleness in ripe hops. Also, ripe cones tend to snap in half or crumble into more pieces if you apply a bit of pressure while pressing.
- Ripe hops feel papery to the touch and have a stronger odor than unripe cones. Plus, the lupulin glands inside the ripe cones will be oilier and stickier than paler resins and essential oils in unripe hops. Unripe hops feel somewhat damp and smell vegetal.
- Brown and somewhat dry hops are overripe and still harvestable unless the hue appears excessively dark, looking almost burnt.
Since you can have hops with varying ripeness in late summer and early fall, typically from August through September, you may need more than one harvest day to pick the cones. Also, you must dry or use fresh hops shortly after picking, so harvest only what you can process.
How To Harvest Your Homegrown Hops
Harvesting homegrown hops for the first time is a fairly simple process because you are unlikely to have a lot of cones in a year. Of course, you may need some help or at least a ladder if your hop vines are spread over a large area or too tall for you to pick the cones by hand.
Broadly, there are 2 ways to harvest homegrown hops:
- Pick the cones by hand, wearing full-sleeve clothes and latex or nitrile gloves. The hop cones have glandular hair that some skin types are sensitive to. Also, wear a mask if you think the aromatic oils and resins are making you feel a bit drowsy, sleepy, or tired.
- Cut the hop bines to take them off the trellis and handpick the cones immediately. Exercise the same caution as you must with picking the cones without cutting off the hop bines. Taking the bines off the trellis is usually necessary for enormous or tall hop vines.
Here are some tips to help you plan and sort your first harvest efficiently:
- Use a large enough bucket or container to pick as many hops as you can in one go.
- Use separate containers and labels if you have more than one variety of hop plants.
- Select a relatively cool day if it is still uncomfortably hot, and don’t harvest in the rain.
- Time your harvesting and drying or using fresh hops within 1 to 2 hours from picking.
If you cannot move harvested hops to processing immediately, at least arrange for some shade, and keep the fresh cones away from direct sunlight and sources of moisture.
How To Dry Homegrown Hops for Beer
You can dry freshly picked homegrown hops for beer using the following:
- Air drying
- Food dehydrator
- Oven, not microwave
A food dehydrator or air drying with a mesh or screen is generally a better method than an oven due to the following reasons:
- Air drying doesn’t expose fresh hops to high temperatures that might deplete the volatile essential oils in the cones. The problem with air drying is the required time to effectively dry fresh hops. You will probably need to wait for 3 days up to 1 week.
- Food dehydrators are faster and more effective than air drying, but you must set a low temperature to retain the volatile compounds. Consider ~120 °F (~49 °C) to 140 °F (60 °C). Don’t opt for a higher temperature even if the drying process takes longer.
- Ovens aren’t a viable option because most have a minimum heat setting of 170 °F (76.6 °C). Even if you have a low-temperature oven that can reach 150 °F (65.5 °C), it is a tad too high to dry hops. The cones won’t retain as much of the useful resins and oils.
You can expedite the air-drying process by using fans. But don’t expose fresh hops to sunlight while drying the cones. You must keep your homegrown hops away from heat and light during the entire drying process. Plus, there should be no adverse influence of ambient moisture.
You have to control the conditions of a processing room if you are air drying, including relative humidity. These challenges often propel homebrewers to use a food dehydrator. But try to avoid using an oven unless you are really short on time and you are fine with overly dried hops.
Furthermore, air drying or a food dehydrator is a more pragmatic way to dry fresh hops because you can have a reasonably accurate assessment of the moisture content in the cones. You need to dry homegrown hops until the cones have around 8% to 10% water content by weight.
Here’s a practical method of assessing the water content in your fresh hops to decide how long or to what extent you should dry the cones for brewing and storage:
- Since this may be your first harvest, pick ~3.5 oz (100 grams) of your homegrown hops.
- Get a paper or plastic bag and a tag to use as a label for the hop variety and other info.
- Write the variety of fresh hops and the quantity on the paper tag, and glue it to the bag.
- Fill the bag with ~3.5 oz (100 grams) of fresh homegrown hops and measure the weight.
- Take the hops out of the bag and process them through air drying or a food dehydrator.
- Measure the decreasing weight of the fresh hops periodically as they dry in due course.
- The dried hops will reach a stagnant weight after they are completely dry, i.e., 0% water.
- Put the dried hops in the bag, measure the weight, and write it on the paper label or tag.
- Deduct this dried hops’ weight from the first measurement you have for the fresh cones.
- The combined weight of the bag and tag are accounted for in both cases, so don’t worry.
- The weight difference is due to the loss of water content from fresh hops to dried cones.
- By now, you know the conditions, duration, and temperature of drying your hop cones.
- Suppose the fresh hops weighing ~3.5 oz (100 grams) are 0.7 oz (20 grams) as dried.
- Retaining 10% of water in these hops requires drying the hops to 0.78 oz (22.2 grams).
Therefore, fresh hops weighing 3.5 oz (100 grams) at 80% water content should weigh 0.78 oz (22.2 grams) with 10% after drying. These figures will likely vary based on the hop variety, water content, and the dried state of the cones.
The University of Vermont has a handy hop harvest moisture calculator you can use if you don’t want to do the math. However, weighing your samples and assessing the figures for fresh and dried hop cones based on the target moisture or water content is imperative.
How To Store Homegrown Hops for Beer
Using fresh hops for homebrew beer requires several changes in the typical process, even with dual-use varieties like Cascades and Centennials. You have to account for the following at least:
- A pH spike that you must counter with adequate acidulated malt in grain bill by weight or adding food grade acids during sparge or to the wort in the whirlpool at knockout.
- An evident gravity drop due to the excess water in fresh hops relative to the dried cones with very little moisture, which affects the quantum of the dissolved solids.
- Alter the boiling phase of your homebrewing process due to the larger volume of fresh hops you will have compared to the dried cones with little or nominal water and weight.
If you don’t counter the adverse impacts of higher pH, more water, and vegetal matter, your beer may be more bitter than you desire or expect. Here is one of my videos explaining the reasons a process or recipe may lead to bitter homebrew beer:
You must store homegrown hops in airtight containers or vacuum-sealed bags in a freezer after drying the cones. Some homebrewers freeze fresh hops in airtight containers, like mason jars or vacuum-sealed plastic bags. But such approaches pose a few problems, like the following:
- The enzymes in the fresh hops aren’t denatured, so the reactions may slowly continue.
- The fresh hops will still have a lot of water and, hence, be vulnerable to mold growth.
- Undried or fresh hops are much larger than dried cones, so storage space is an issue.
The ideal approach to storing homegrown hops for beer is drying the cones, packing them in a vacuum-sealed bag or compressing the dried produce in airtight containers, and freezing those packs. Like blanching, drying fresh hops will prevent enzymatic reactions and oxidation.
Whether you use airtight containers or vacuum-sealed bags, I recommend storing dried hops in small packs so that you can get one or a few out of the freezer based on your requirements and use them to homebrew beer without affecting the remaining bulk of frozen cones.
Nitrogen purging and vacuum-sealing is the most effective approach, but homebrewers may not have the required tools. You can use airtight containers as long as you compress the dried hop cones adequately while packing to push all the air out to the extent possible.
Final Thoughts
Don’t harvest unripe hops, irrespective of the variety and your homebrewing process. Harvest hops before they are overripe, which will be evident if the cones are brown or darker. Dry fresh hops to have 8%~10% water content before vacuum-sealing and storing them in a freezer.


