Guide: How To Grow Hop Plants for Beer at Home
Hop plants are the plants that get harvested to produce Humulus Lupulus, the flowering plant used for beer brewing. If you’re interested in brewing a nice, hoppy beer from the Humulus plant, there are a few things to consider to grow a successful harvest.
Growing hop plants for beer at home is a simple process that requires hops cuttings or rhizomes, adequate sunlight, soil and water, and space for the plant to spread and climb. This perennial will eventually produce the flowers you’ll harvest to brew your delicious, hoppy beer.
Growing a vigorous, healthy Humulus Lumulus plant is essential to home-brewing beer; the flowers are responsible for the flavor, bitterness, and aroma that make having an ice-cold brew enjoyable. Keep reading to learn how to grow hop plants for beer at home.
If this is your first time brewing beer from scratch, check out this link for an easy guide to home brewing.
1. Propagate Your Hop Plants
Propagating a Humulus Lupulus plant usually happens through cuttings from a mother plant or propagating a rhizome. A rhizome is a fast-growing plant shoot at its crown (beneath the soil, near the plant’s root ball).
Propagation is a necessary first step because most growers advise against growing a Humulus plant from seeds.
The difference between a cutting and a rhizome is that the cutting produces roots in water, while the rhizome grows roots in the soil.
To Grow From a Cutting
If you want to grow a hop plant from a cutting, here is the process to follow:
- Locate a node on the mother Humulus Lupulus plant. The node is where buds, stems, and leaves grow, often forming a knot in the stem. There can be multiple nodes along a hop stem, and the larger the plant is, the more nodes it will have.
- Choose a stem from the mother plant with more than three nodes along it, and cut just above one of the nodes using sterilized shears or a sharp, clean knife. This will ensure that the stem can continue producing new growth out of the cut stem.
- Place the cutting in water and let sit for a week or two. The cutting should grow healthy, white roots. Once this happens, you can plant the rooted cutting in the soil to start growing.
To Grow From a Rhizome
If you’d like to grow a hop plant, this is what you need to do:
- Locate the rhizome from the mother plant. It will be deep beneath the soil, growing as small roots from the primary root system. To produce a Humulus Lupulus from a rhizome, you’ll first need to dig up the mother plant’s root ball to find its rhizomes.
- Take out the mother plant by digging a few centimeters deep with a small shovel. You’ll eventually reach the root ball, which you can remove from the soil and the plant. Rhizomes look like offshoots of the root ball.
- Using sterilized scissors, cut five to six inches (12.7 to 15.2 cm) of a rhizome from the main root system.
- Immediately plant the rhizome in well-draining soil, water it thoroughly, and cover the area to maintain adequate moisture levels.
The rhizome should quickly produce roots and begin the growing process.
2. Choose the Best Location
Hop plants require specific growing conditions, so choosing an appropriate location for the bine to grow is vital. Whether you want to grow your plant in a container or outdoors, there should be adequate space for the Humulus plant to grow.
This plant is a large, bushy climbing vine, so choose a location that can accommodate the hop plant’s size and height. The vine also tends to spread– you can prevent this by reading up on it here. Unless you’re planning on trimming and pruning regularly, provide the plant with ample space to thrive.
Large breweries may plant multiple clones amidst massive fields or along small hills. This helps the Humulus plant spread and grow effectively. Your chosen site must have at least six hours of direct sunlight daily.
To achieve this, you should plant your Humulus lupulus plant facing the south, east, or west, where it will receive adequate light.
3. Plant Your Clone in the Soil
Once you have propagated your hop plant and selected the ideal location, it’s time to plant your clone in soil.
Sandy loam soil is mixed with sand and clay, giving the mixture excellent drainage qualities. This is the best type of soil you want to use for your hop plant.
All soils have varying pH levels. Hop plants prefer soil with a pH level between six and seven, and you should also apply fertilizer containing potassium, nitrogen, and phosphate to the soil.
If you are planting outdoors, the best time to do so is after the frost has died down in early spring.
Plant the cutting or rhizome approximately an inch (2.54 cm) deep in a weed-free area and cover it with soil. The hop plant is a perennial, and it will go dormant at first frost until the following year.
4. Water the Hops Plant Thoroughly
After you have planted your hop plant in the soil, you should ensure that you water it thoroughly and immediately. The Humulus Lupulus plant prefers moist but not waterlogged soil. Watering it too often or too much can result in root rot.
When you first plant it, it’s best to water the Humulus lightly daily. This helps it develop a robust root system. It’s vital to do so regularly during the plant’s first growing year; instead of giving the plant two inches (5.08 cm) of water once a week. You should spread out the two inches of water each day.
Once the hop plant has matured, however, you can reduce the daily feeding schedule to only providing the Humulus with two inches of water once a week. If you only have one hop plant, you will manage with manual watering. In contrast, large fields of hop plants might need a different, more convenient method of watering.
Irrigation Systems for Mass Watering
An irrigation system is one of the easiest ways to ensure your crop of hop plants gets the water required without you needing to go through manual watering, which can be time-consuming, especially if you have many plants to attend to.
There are numerous forms of irrigation to consider, and the main ones include:
- Pumps
- Sprays
- Tubes
These systems are all designed to deliver water to a plant in a specialized way.
For example, some irrigation systems are underground and deliver water precisely to the plant’s roots. Others may provide water droplets to the soil surrounding the plant’s crown. Sprinklers, pipes, and canals distribute water over land or directly onto each plant.
If your hops are outside, you can also rely on rainfall as a watering method; many breweries will supplement a lack of rainfall with drip irrigation, which gives the plants’ crowns droplets of water over time. This is the most common watering method for hop plants.
5. Provide Your Hops Plant With a Trellis
Hop plants are climbing vines (or bines, for the Humulus Lupulus), so you should provide yours with a trellis or a ladder and train it to climb when the plant starts sprouting vines. These vines climb counterclockwise, and training them to climb the other way can cause complications with the plant’s growth.
With this in mind, make sure to train the vine in a counterclockwise direction around the trellis. The Trellis for Climbing Plants (available on Amazon.com) is perfect for indoor, individual hop plants. The Chamgoal Garden Plant Trellis Netting on Amazon.com is also handy for one or two outdoor plants.
If you have a larger crop of hop plants, though, you’ll need to choose a trellis that suits the plant’s locations. The Metal Garden Arbor (available on Amazon.com) is a good example of a trellis that can accommodate multiple vines. Most local gardening stores also sell various types of trellis for large crops.
6. Maintain Your Hop Plant
Lastly, keep a close eye on the hop plant over the next few weeks and months to ensure it is getting everything it needs to survive. This includes water, light, a trellis, and fertilizer if desired. With adequate care and patience, you’ll grow amazing hop plants for beer.
What To Expect When Growing Hop Plants at Home: For Beginner Gardeners
When first planting your Humulus Lupulus, you may need to figure out what to expect for the first few months of the growing season. The first year is when the plant works hard to develop a strong, healthy root system. Thus, it will not produce any flowers until its second bloom.
So, your job for the first year is to water the Humulus adequately and provide the plant with light and fertilizer. It’s advisable not to prune or trim the plant because that diverts energy from the roots and into the plant’s stems.
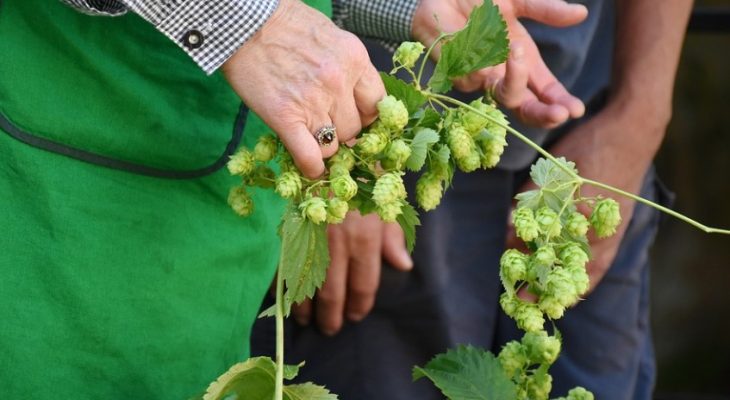
After the hop’s first dormancy and second bloom, you’ll notice that flowers will start growing off the vines. These flowers look like small, green pine cones; these are what you’ll eventually harvest to start brewing your own beer.
It’s important to note that a male Humulus Lupulus will only climb and cannot be harvested for beer brewing. You can tell the difference between a male and female hop plant by their flowers– a male plant will produce small bunches of little flowers and no cones, but a female will produce many cones and no flowers.
How To Harvest Hop Flowers
Harvesting hop cones is simple and involves checking if they are dry. Below is how to check if they are dry:
- The cone will have various dry lupulin. These resemble tiny yellow peas and are usually sticky. However, when they’re ready to be harvested, the cone’s innards will lose their moist texture and dry out. That’s when you know they are ready to be plucked from the vine.
- The cone will ooze sticky juices. You can see the sticky juices when you squeeze the cone. Opening up the flower down the center will speed up the drying process.
Once you have determined that the hop cones are dry, here’s how to harvest them:
- If the cones are dry, gently pull them off the bine, and store them in an airtight container.
- If the cones aren’t dry, you can remove sections of the bine and lay them in a warm room to fully dry out.
You should also consider reading up on the equipment needed for home brewing. Making your own beer can be very rewarding, but using the correct equipment is essential. Here is what you’ll need to brew your own beer:
- A kettle
- A large, multi-gallon pot
- Bottles to store the beer in
- Wort masher
- Thermometer or temperature control lid
- A grain mill
There’s no shortage of excellent devices for each beer brewing method, so be sure to check out other articles on homebrewadvice.com for more information.
Why Lupulin Is So Important
Lupulin, which gives the Humulus Lupulus its name, gives beer certain flavors and balances out others in different strains. The lupulin seeds are ground into powders that are used during the brewing and fermentation process.
Some people are allergic to hops and can’t drink beers with hops as an ingredient. If that’s the case, check out this article about alternatives you can use during brewing. Beer may taste mildly different without hop flowers; you can get a better picture of that by reading this piece.
Final Thoughts
In conclusion, growing a hop plant is similar to growing any other plant from home. Its main requirements include daily to weekly watering, sunlight, and a trellis to climb on. During its second year, the plant will begin to produce the flowers that are needed for beer brewing, and you can harvest them to get started!
After reading this guide, you’ll hopefully have a better understanding of how to grow your own hop plants for a beer at home!


