Equipment Needed for Brewing Beer (23 Must-Haves)
When home brewing beer there are lots of tools that can make your process easier or better. Whether you are a beginner or a more seasoned home brewer, there are tools you can use for your brewing process to make it better, easier and faster.
In this Blog Post you will find a complete guide to all the handy tools a home brewer needs.
The 23 Must-have Homebrewing tools I will go over in this blog post is as follows:
Needed Tools:
- Brewing Pot/Kettle
- Heat Source
- Fermenter Bucket/Carboy
- Bottling Bucket
- Cleaner And Sanitizer
- Airlock And Stopper
- Racking Cane or Auto-Siphon
- Nylon Bags for Hops
- Hydrometer
- Thermometer
- Bottles, Bottle Caps and Bottle Capper
- Bottling Wand
Nice-to-have Tools:
- Stirring Spoon
- Strainer
- Brew In a Bag
- Mash Tun
- Bottle Brush
- Home Brew Kegging System
- Wort Chiller
- Refractometer
- Homebrewing Books
- Fermentation Fridge/Temperature Controller
- Wort Aeration System
Some of this equipment is more necessary than others, but even the ones that aren’t 100% necessary to brew successfully might make your brewing process more smooth and easy if you acquire them.
Read on as I dive into what equipment on the above list is absolutely necessary and what is optional, yet very nice to have.
12 NEEDED Tools For Home Brewing
There is a huge range of tools you can use for home brewing, but there is a key difference between tools you need for home brewing and the tools that are just nice to have.
In this section I will go over some essential pieces of equipment you need to brew beer at home properly. To give you a quick and easy overview, I’ve created a table which quickly sums up each tools’ function, estimated price and where to purchase it.
| Needed Tools For Homebrewing | Function | Price | Where to Buy |
| Brewing Pot/Kettle | Used for Boiling and Mashing | ~$20-95 | Amazon |
| Heat Source | Used for heating up your batch | ~$50-100 | Amazon |
| Fermenter Bucket/Carboy | Storage during fermentation process | ~$20-400 | Amazon |
| Bottling Bucket | Storage after fermentation and before bottling, often comes with spigot | ~$15-50 | Amazon |
| Cleaner And Sanitizer | Used for making sure no hostile bacteria is present on equipment and bottles | ~$5-40 | Amazon |
| Airlock And Stopper | Allows CO2 to escape while keeping oxygen away during fermentation | ~$5-15 | Amazon |
| Racking Cane or Auto-Siphon | Used for transferring beer from fermenter to bottling bucket with minimum spillage | ~$5-25 | Amazon |
| Nylon Bags for Hops | Makes sure hops doesn’t break off and infiltrate beer liquid | ~$5-20 | Amazon |
| Hydrometer | Used for measuring gravity in beer, great for indicating whether or not fermentation is complete | ~$10-20 | Amazon |
| Thermometer | Tracking temperature to make sure the right conditions are met, espcially for yeast during fermentation | ~$8-30 | Amazon |
| Bottles | Holds your delicious beer, and is used in the last step of beer making – bottle conditioning/carbonation | ~$10-40 | Amazon |
| Bottle Caps | Used to close bottles airtight to make sure they condition right, as well as keeping the content in the bottle | ~$5-20 | Amazon |
| Bottle Capper | Used to close bottle caps properly, cant be done by hand if using metal caps, making this tool necessary for these caps. | ~$5-25 | Amazon |
| Bottling Wand | Used for easy and accurate filling of bottles | ~$5-20 | Amazon |
IMPORTANT NOTE: Prices shown might not correspond with current price. Please take it as an estimation.
These are all pieces of equipment that I’d recommend you have before starting home brewing.
In a later section of this post I will dive into some very cool gadgets you can adapt into your homebrewing endeavour to make it more advanced and/or more efficient.
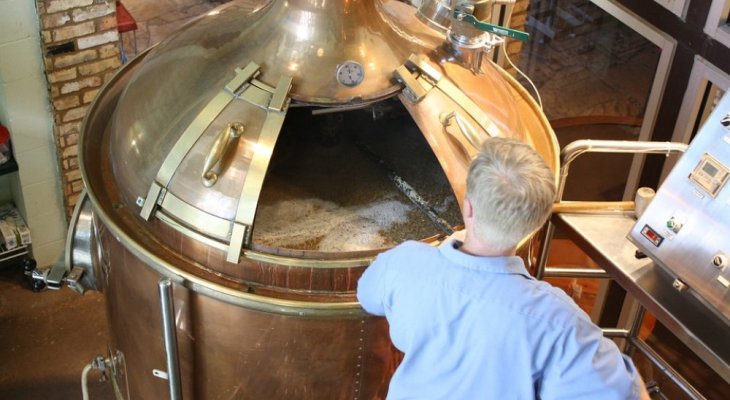
#1 Brewing Pot/Kettle
The first thing you’ll need is something to actually make your mash in, which is a pot or kettle. The size depends on how large you want your beer batches to be. Most homebrewers use 5 gallon or larger pots, since this is often the amount of beer that recipe kits can make.
Some equipment kits have these pots/kettles included but most require you to buy them yourself.
I made a blog post on homebrewing kits for beginners, check it out!
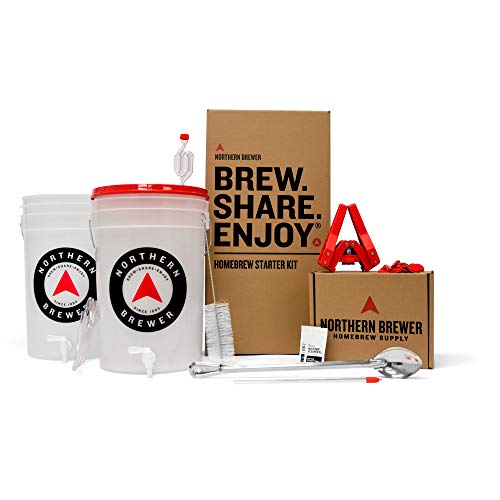
- Highest Rated Starter Kit! The Northern Brewer Brew. Share. Enjoy Homebrew Starter Kit is perfect for holiday gifts and beginners,...
- This all-in-one kit includes everything you need to start brewing beer at home today including siphonless fermenters and our Block...
- Block Party Amber: It's deep garnet glow accommodates friendly flavors of toasty bread crust, caramel, and an inkling of floral and...
Last update on 2026-05-15 / Affiliate links / Images from Amazon Product Advertising API
#2 Heat Source
A bit of a no brainer, nevertheless worth mentioning that you need a heat source powerful enough to heat up your batch. Make sure your heat source can heat up your batch efficiently, depending on which size it has.
A regular kitchen stove is fine for smaller batches, but once you get above the 5 Gallon mark you have to acquire a heat source suited for boiling larger volumes.
Check out some examples in Amazon by clicking here.
Read Also: What Are The Best Propane Burners For Homebrewing?
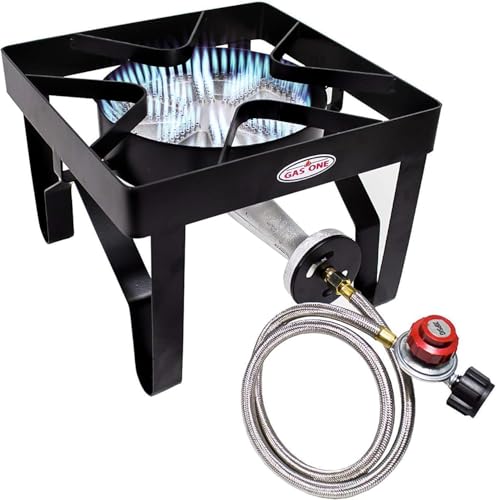
- A Professional Choice: If you love outdoor cooking, it’s time to make it even more enjoyable and fun with Gas One! Our single...
- Built to Last: The Gas One propane camp stove is built for superior performance and safe cooking! That’s why our outdoor burner...
- Heat-Control Regulator: Our propane burners for outdoor cooking come with a special regulator knob that allows easy heat control. The...
Last update on 2026-05-15 / Affiliate links / Images from Amazon Product Advertising API
#3 Fermenter Bucket/Carboy
The next thing you’ll need is a fermentation bucket or carboy for storing your beer while it ferments.
These come in different variants, and are often seen as big plastic/stainless steel buckets or clear glass carboys.
NOTE: The plastic buckets are very cheap and do the job quite well, however there are some downsides to using these compared to glass variants.
Due to the nature of plastic products, it can slowly degrade over time and actually allow for some oxygen to enter your beer if you haven’t changed out the bucket in a while. This can lead to oxidation of your beer, which can ruin it and spoil all your hard work.
Make sure if using plastic buckets as fermenters, that you change them out every now and then, and make sure they don’t have any dents, scratches or holes that can lead to contamination of your beer.
The glass carboy type of fermenter is a bit more safe, but usually more pricey. The glass carboys are a more aesthetically pleasing type of fermenter, giving that true home brew feel. The reason why some home brewers hate using these is the difficulty of cleaning them versus the bucket type fermenters.
The shape of the carboy can make it quite difficult to clean off any residue on the inside compared to simply just popping off the lid of a bucket and cleaning the sides.
Stainless steel fermenters (Amazon link) are what commercial breweries mostly use, but are quite pricey for the hobby homebrewer.
These fermenters are usually used by the more advanced home brewers, since they come with quite a larger investment, but they do the job amazingly well. They often come as a combined fermenter+bottling solution, so there is no need for racking your beer.
You can really choose any of these fermenter types, but personally I’d go for the glass carboy both due to the authenticity but also the lower risk of contaminating my beer.
You can buy any type of fermentation bucket or carboy on Amazon. Get some inspiration by clicking this link.
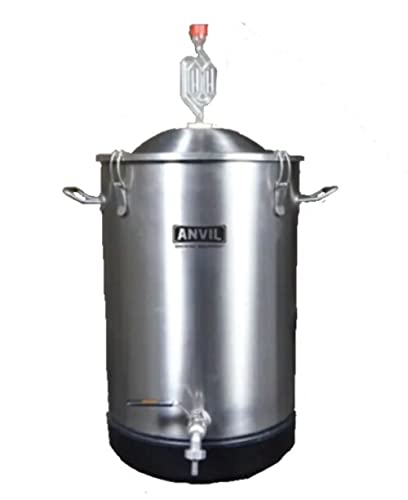
- 304 Stainless Steel
- Coned Bottom
- Rotating Racking Arm
Last update on 2026-05-15 / Affiliate links / Images from Amazon Product Advertising API
#4 Bottling Bucket
A bottling bucket is usually a bucket made of plastic that has a spigot attached to it which you use to transfer the beer into your bottles.
This is done right after fermentation, and its purpose is simply just a container which you rack your beer to, to get rid of any residue left over from fermentation and making sure that beer and only beer goes into the bottles.
These Bottling buckets come in different variants, and can be easily purchased in many stores. You can check out some examples on Amazon by clicking here, and find the one that suits best for you.
#5 Cleaner And Sanitizer
I can’t stress enough how important it is to sanitize and clean your equipment properly when home brewing.
The brewing process can be quite delicate, so any hostile micro-bacteria or similar can potentially ruin your entire batch.
Make sure you have the right cleaning and sanitizing equipment (Amazon link), to make your equipment and bottles sparkling and free from any hostile bacteria.
For cleaning there are home-brew specific cleaners, but any house-hold cleaning product should also work.
TIP: stay away from scented cleaning products as it could give an unwanted aroma or taste to your beer.
Remember that a sanitizer is different from a cleaner, since its job is to make sure there are no hostile microorganisms present in/on your equipment.
No products found.
#6 Airlock And Stopper
An airlock is a vital component needed for fermentation of your beer. The airlock makes sure that no oxygen enters your beer while fermenting, while still allowing the build-up of CO2 to escape.
There are generally 2 types of airlocks well suited for homebrewing, which are bubble/s-shape airlocks and 3-piece airlocks.
The 2 types do the same job quite similar, and the key difference is simply how annoying it is to clean and the price. The S-shape airlocks can be a bit difficult to clean due to their curvy shape, but they are relatively cheap so you could simply just use a new one every time you start a new batch.
REMEMBER: If not cleaned thoroughly, the beer could be ruined due to the presence of bacteria.
The 3-piece airlock can be taken apart into 3 pieces, making it way easier to clean than the s-shape airlock. Whatever you choose, both will do the job, but most home brewers tend to go for the 3-piece airlocks mostly because it’s easier to clean.
If you want more in-depth detail about these airlock types as well as some interesting air lock alternatives, you can read My blog post on The Best Airlocks For Homebrewing.
The stopper, also called a bung, is quite simply a small cork-type rubber piece with a fitted hole for the airlock. It is there to make sure the fermenter is completely airtight while allowing your airlock to do its work perfectly.
Get some inspiration on airlocks by clicking this link here (Amazon link).

- Made Of Durable Plastic
- Used To Maintain Sanitary Conditions For Fermentations
- Easy To Use
Last update on 2026-05-15 / Affiliate links / Images from Amazon Product Advertising API
#7 Racking Cane or Auto-Siphon
Racking canes are used to transfer your beer from the fermentation bucket to your bottling bucket.
They are quite necessary tools to transfer your beer properly. If you try to do it by hand or using some other container or similar, you may get unwanted residue into your bottling bucket, and thereby into your beer bottles.
Now an auto-siphon is similar, yet way more efficient if you ask me (and pretty much any other home brewer).
An auto-siphon uses the same principle as the racking cane, however it removed the need of having to create a vacuum manually which you have to do with an ordinary racking cane.
All you gotta do is pump the auto-siphon for about 15-30 seconds and it will then create an on-going flow using gravity to transfer your beer easily. The only job you have, is to make sure the auto-siphon is upright and the tip is submerged fully in your beer.
So if you want an easy way to transfer your beer from fermenter to bottling bucket, I’d definitely recommend you get an auto-siphon, however a racking cane works fine too, but it requires more work.
You can check some examples on Amazon by clicking this link.

- Disassembles easily for cleaning
- Clear tubing to see the liquid while transferring
- Designed to minimize pick-up of sediment during transfer
Last update on 2026-05-15 / Affiliate links / Images from Amazon Product Advertising API
#8 Nylon Bags for Hops
These nylon bags are used when adding hops to your boil.
They quite simply makes sure that the hops don’t break off and stick to the bottom of your kettle, giving the nice flavor and aroma, but staying inside the bag for easy removal.
TIP: You can buy nylon bags in most stores. However, I’d recommend buying hop bags specifically made for brewing.
You can find examples of nylon bags for hops by clicking here (Amazon link).
#9 Hydrometer
A hydrometer is a tool used to measure the gravity and sugar density of your beer and your wort.
A hydrometer isn’t 100% needed but it is a tool that will help you monitor your fermentation, and give you a good indication as to which steps to take.
Without a hydrometer you have to just trust the visuals and your own judgement as to how your beer is doing, which is alright if you are a seasoned homebrewer having done the same recipe a hundred times over.
If you are a beginner on the other hand, you should definitely get a hydrometer, as it will make your brewing life way easier and help you understand whether or not your beer is brewing as it should.
Hydrometers come in cheap, yet effective variants. Check out hydrometers on Amazon here.
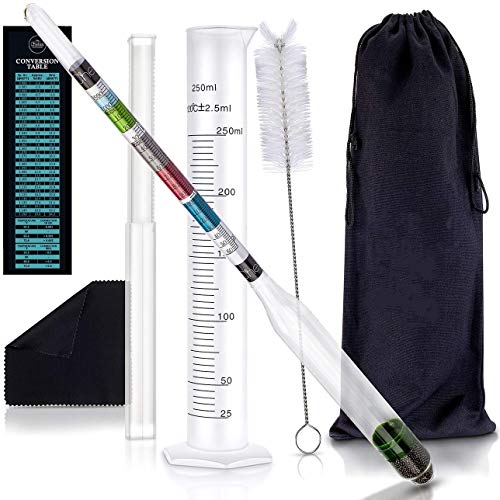
- Accurate Brewing Measurements: Get precise specific gravity, alcohol, and Brix levels with this triple scale hydrometer alcohol test...
- Break-Resistant Test Jar: This brew hydrometer kit includes a plastic test jar, offering a safer, more durable alternative to glass,...
- Easy to Read Scale: The specific gravity hydrometer has clear, detailed markings ranging from 0.99 to 1.17 for specific gravity, 0 to...
Last update on 2026-05-15 / Affiliate links / Images from Amazon Product Advertising API
Read Also: Is A Refractometer More Accurate Than A Hydrometer?
#10 Thermometer
It is debatable whether or not a thermometer is necessary but let my tell you why I think it is.
When pitching yeast it is important to do it at the right temperature. Again if you aren’t a seasoned homebrewer you are probably not familiar with the right temperature quite yet.
To be certain your temperatures are correct, buy a thermometer and make sure it is a type that can handle high temperatures.
On Amazon you can find all kinds of thermometers, so make sure it is one suited for homebrewing and not the kind used to take your temperature when you’re sick.
You can click here if you want to check out this thermometer suited for homebrewing.
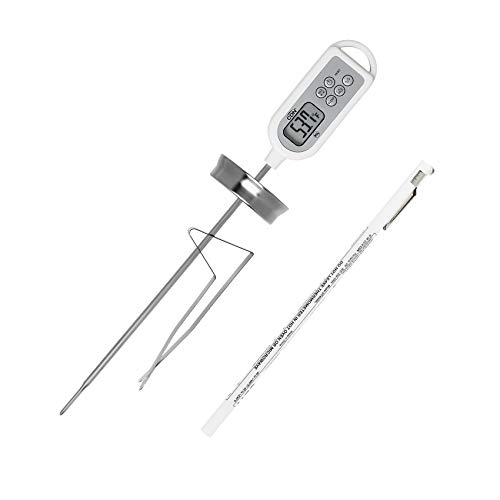
- Measurement Range: -40 to +450°F/-40 to +230°C
- NSF Certified; BioCote technology; member of the ProAccurate professional line
- 2.5 mm reduced tip with 8"/20.3 cm stainless steel stem with heat shield and exclusive adjustable stainless steel clip
Last update on 2026-05-15 / Affiliate links / Images from Amazon Product Advertising API
#11 Bottles, Bottle Caps and Bottle Capper
Of course you’ll need some bottles with fitting bottle caps and a bottle capper. Once your fermentation has completed and you’ve racked your beer to your bottling bucket, you obviously need some nice bottles to fill that delicious beer into.
There are various types of bottles you can choose, and some doesn’t even require the bottle caps and bottle capper.
You can choose to use swing-top bottles for example, which can be reused multiple times and are very easy to close and open. Most homebrewers tend to use either these types, or the traditional long-neck type bottles with metal bottle caps.
You can find both bottle caps and bottle cappers on Amazon.
I wrote another blog post going into a lot more detail about this – Read My Blog Post on The Best Bottles For Homebrewing Here.
#12 Bottling Wand
A bottling wand, or bottle filler is a tool similar to a racking cane or auto siphon used to transfer beer to a bottle.
The beautiful thing about a bottling wand, is that it can be adjusted to fill up each bottle with extreme accuracy, and leaving the right amount of headspace as well.
A bottling wand allows you to fill up your bottles from the bottom to the top, which makes sure that minimum oxygen enters your beer as you fill your bottles.
You will also save yourself any spillage, since a bottling wand (Amazon link) will always fill perfectly and not waste any of your tasty beer.
11 Nice-to-Have Tools for Homebrewing
You now know the needed tools for homebrewing, but we aren’t done yet my friend!
In the homebrewing world there are many tools to make your brewing more advanced and efficient. Many of the tools you find below are made for convenience, making processes faster or easier and generally giving you a better experience when home brewing.
None of these products are actually required to brew beer successfully, but some of them bring new processes to the table that will definitely amplify your brewing skills.
Like I did with the needed tools, I made a table once again showcasing the function and estimated price of these nice-to-have tools and provided links so you can buy them online if needed.
| Nice-to-Have Homebrewing Tools | Function | Price | Where to Buy |
| Stirring Spoon | Stirring your beer to remove risk of building up big amounts of residue | ~$5-15 | Amazon |
| Strainer | Prevents hops and other solids from entering fermenter while transferring | ~$5-15 | Amazon |
| Brew In a Bag | Gathers most sediment and residue during boiling, making your beer more clear | ~$10-20 | Amazon |
| Mash Tun | Used for bigger batch brewing. Holds heated water used for mashing/sparging | ~$100-400 | Amazon |
| Bottle Brush | Easy tool to clean your bottles quick and easy | ~$5-10 | Amazon |
| Home Brew Kegging System | A super fast way to carbonate beer | ~$70-450 | Amazon |
| Wort Chiller | A quick way to chill your wort, without having to use ice baths | ~$25-200 | Amazon |
| Refractometer | An upgrade from a hydrometer, requires only a tiny sample and makes reading in a few seconds | ~$10-25 | Amazon |
| Homebrewing Books | Gain knowledge on homebrewing, great for both beginners and seasoned homebrewers | ~$10-30 | Amazon |
| Fermentation Fridge/Temperature Controller | Great tool if living in a warmer climate, controls the temperature during fermentation and carbonation | ~$35-300 | Amazon |
| Wort Aeration System | Proper oxidating of wort, gives yeast the healthiest conditions for a better tasting beer | ~$10-40 | Amazon |
IMPORTANT NOTE: Prices shown might not correspond with current price. Please take it as an estimation.
Continue reading if you want more details about each of these tools, and a greater understanding of what they can do to make your homebrewing adventure more enjoyable!
Stirring Spoon
When mashing and boiling, it is often, if not always necessary to stir your mixture.
REMEMBER: Use a spoon long enough so you can reach the bottom of the pot/kettle, and yet being able to hold it properly.
You may already have a stirring spoon suitable for homebrewing, but once you get above 5 gallons in volume, you may have to acquire a larger spoon suitable for these big batches.
The material of the spoon needs to be able to withstand boiling temperatures. The most common materials used for stirring spoons is stainless steel, plastic, or wood.
You can check out Amazon’s variety of very affordable stirring spoons here.
Strainer
When you rack your wort from your brewing pot or kettle to your fermenter, many home brewers choose to run the wort through a strainer. This will prevent any hops or other solid materials to be transferred to the fermenter, which could contaminate it.
You can really use any food-grade strainer for this purpose (Amazon link), but make sure it has a suitable size so you don’t spill over the edges when transferring your wort.
Brew In a Bag
A Brew in a bag or BIAB for short, is similar to a nylon/hop bag but way bigger. The point of a BIAB is using a bag big enough to fit around your entire brew pot or kettle, but making sure that it doesn’t touch the bottom.
This bag will minimize any sediment or residue that often occurs when mashing, and make your beer more clear.
You can make homemade versions of these, or simply buy them online (Amazon link).
Mash Tun
As you may know, when mashing out, you need to sparge with water.
For larger batches of beer it can be quite difficult to have a big amount of water at the right temperature ready, but the mash tun makes this easy.
Homebrewers use mash tuns to hold heated water and grain at specific temperatures during mashing, and also to separate the wort from the grains.
So if you are getting into larger batch brewing, you should definitely get a mash tun to make your life easier!
You can check this one on Amazon or find the one that suits best for you.
Bottle Brush
Some homebrewers will probably suggest that this is a NEEDED piece of equipment, but you can clean your bottles by submerging them in sanitizer/cleaner as well.
It is quite crucial to clean all your equipment, and your bottles are no exception. A bottle brush (Amazon link) is made specifically to clean bottles efficiently and fast.
TIP: Dipping your bottles in sanitizer first and brushing them afterwards will almost remove all risk of spoiling your beer after you have bottled them.
Home Brew Kegging System
A kegging system is pricey, yet a very efficient tool to carbonate your beers with lightning speed.
The kegging method forces your beer to react to CO2 way faster by keeping it enclosed in a keg and infusing it directly with CO2.
Usually it takes between 2-3 weeks for a beer to fully carbonate in the bottle, but with kegging it only takes 2-3 DAYS.
If you are ready for the investment, this method of carbonation can save you a lot of time, which is perfect if you are impatient and can’t wait to drink your own delicious homemade beer.
As you will be spending a significant amount of money, I’d recommend you to research before and find the one that suits you best.
By clicking here you can see one of the many different models you can find on Amazon, but there are many other options online.

- The first complete taproom in a box!
- One NEW Draft Brewer 5-Gallon Ball Lock Keg
- CO2PO Dual-Gauge CO2 Regulator
Last update on 2026-05-15 / Affiliate links / Images from Amazon Product Advertising API
I wrote a blog post on How Long it Takes for a Beer to Carbonate in a Bottle where I explain the kegging method more in-depth.
Wort Chiller
A wort chiller, also called an Immersion Plate Chiller reduces the time it takes to cool down your wort substantially.
When using a wort chiller you remove the need to use an ice batch or similar to cool down your wort. The big plus of buying a wort chiller, is that it is reusable and will last for a long time.
Wort chillers are made up of copper piping, metal fasteners and heat resistant tubing.
The way a wort chiller works is by using cold water which flows through the copper piping, this absorbs the heat from your wort and transfers it to the cold water, which runs out the other end of the piping. This makes the process of cooling down your wort extremely fast compared to using an ice batch.
TIP: To avoid leaking where the tube connects to the copper, don’t run the water full blast.
Click here to check out Amazon’s best seller wort chiller.
Refractometer
A refractometer is similar to a hydrometer, but a bit more advanced.
The key difference is the speed of which you can get readings using a refractometer versus a hydrometer.
A hydrometer requires the sample to cool down a bit before a proper reading can be taken, but with a refractometer you can just use a few drops and get a reading almost instantly.
So once again we are talking about a tool which can save you time, and time is quite valuable to many homebrewers, especially those with a family that might need some attention.
Check out homebrew specific refractometers on Amazon here.
Homebrewing Books
One of the best ways to either get started, or evolve your homebrewing adventure is reading books on homebrewing.
There are a ton of great homebrewing books suited for beginners or veterans in the craft.
I’d definitely recommend you read about home brewing as a beginner, especially if you aren’t using a kit with detailed instructions.
One book I personally own is How to Brew by John J. Palmer (Amazon link). This is a customer appraised book that is suited for both beginners and seasoned homebrewers, this book is a great tool to make sure you are doing everything right when brewing beer at home.
Fermentation Fridge/Temperature Controller
This piece of equipment is often a homemade tool to make sure your fermentation has the right temperature.
If you live in a climate where the temperature can make it difficult to ferment successfully, you can modify a fridge of any size to fit your fermentation bucket/carboy inside, which makes it easy to hold the right temperature.
Not excited about the idea of making a fridge yourself? Check out this one on Amazon.
No products found.
Make sure you acquire a fridge where you can add a temperature controller (Amazon link) to adjust the temperature to be exactly what you want it to be, and make sure it is large enough to fit your fermentation container inside.
TIP: Avoid leaving the fridge outdoors, as over time performance will be affected.
Wort Aeration System
This tool is used to proper oxidate your wort and yeast to give it the healthiest conditions possible.
It can substantially change the entire flavor and feel of your beer if you do it right. The downside of doing this is that it adds extra time to your brewing process, usually anywhere between 30 to 120 minutes.
Check out this one on Amazon to get some inspiration, and find the right one for you.
If you made it this far, well done! You now know pretty much all the neat equipment to have for homebrewing.
I hope this post was helpful, and answered any questions you might have about equipment and tools used in homebrewing
If you want to know more about the actual ingredients in beer you can check out the next section of this blog post!
The Main Ingredients in Beer
So you now know everything there is to know about the equipment and tools you need/can use for homebrewing, but now you may be wondering what ingredients you need to make beer.
The 4 Main Ingredients in Beer
Making beer requires very few ingredients, and those ingredients can be bought very cheap.
Overall there are 4 main ingredients required to brew beer:
- Grain. When making beer the fundamental process requires a grain type which has a good starch content for fermentation. The grain goes through a malting process which amplifies and prepares the starch inside. The Grain is then soaked in water which converts the starch into sugars through something called germination. The most used type of grain is Barley, since it quite simply is best suited for this germination process, where other grain types can prove a bit more difficult. The grain type you use can decide the alcohol content, taste and overall aroma of your beer.
- Water. Water makes up between 90-95% of the content in any beer. You may think that the water used in brewing is rather irrelevant, but that is not exactly the case. There can be issues with water usage, where some water can be hard or soft, have various PH levels or have higher or lower presence of minerals. Make sure the water you use is of proper quality.
- Yeast. The most vital part of making any alcohol. Yeast is the little guys responsible for turning sugar into alcohol. Yeast is a living fungus or microorganism that eats up the sugar in the grains and turns it into alcohol and carbon dioxide. The brewers job is to make sure that the yeast has the right conditions to work properly. Here temperature control is very important, since yeast can go dormant or outright die if it has the wrong temperature. Depending on which yeast you use it may affect the taste of your beer, but its main role is simply to create alcohol content for your beer. Check out my blog post titled “Can You Make Alcohol Without Yeast?” for more information.
- Hops. The main role of hops is to balance out your beer and create the proper flavor and aroma. When you add hops to your boil it directly affects the flavor of your beer. When you add hops during boil its usually to create a more bitter taste where you mostly affect the aroma when adding them later on in the brewing process. There are over 170 variants of hops used for beer making the ability to create unique tastes quite vast. Hops are the only ingredient you can leave out and still make beer, however the taste and smell of your beer will probably be quite horrible if it isn’t balanced out by using hops.
So that’s all the ingredients you need to make beer. There are hundreds of beer variants where people have adapted other ingredients such as chocolate, fruit or coffee.
I wrote a blog post about coffee flavor in beer – Read How To Add Coffee Flavor to Beer Here.
Home Brew Ingredient Kits
If you don’t want to worry about having the necessary ingredients for the beer you’re trying to make, you can simply buy a beer ingredient/recipe kit that has everything you need inside.
These kits are especially beneficial to beginners, since most of them come with detailed instructions to make it easier to avoid errors when brewing.
If you want to check out some nice beer ingredient/recipe kits you can read My Blog Post on Best Beer Recipe Kits.
Related Questions
How Long Does It Take to Brew Beer? The whole process of making beer takes a minimum of 4 weeks. Different variants of beer may require a while longer fermentation and carbonation times, especially darker beers. There are processes you can adapt to speed up your brewing process, but the fermentation and carbonation times are necessary in most cases.
»Read More About How Long Homebrew Takes in My Blog Post Here
Is it Cheaper to Brew Your Own Beer? Making your own beer can save you money in the long run, but is not why homebrewers do it. If you don’t care much about the quality of equipment and ingredients used in homebrewing, you can make some very cheap beer compared to store bought beer. Homebrewing is a hobby, so most homebrewers don’t care that they might lose money, but enjoy the whole journey of making something they can enjoy all by themselves.
Read My Blog Post “Does Homebrewing Save Money?” for more info!
Do You Need a License to Sell Homebrew? In the US the difficulty of getting a license to sell homebrew differs from state to state. It is generally rather hard for a single-person to get a license to sell homebrew, since it’s mostly reserved for actual breweries. A single-person household brewery also has a cap of 100 gallons of beer per year.


